

Ride the lightning (a Metallica album), catch the rainbow (some Hippie phrase)… mashed together to form this post’s headline.
We did a trip to Sardinia. On that trip I wrote several posts on the iPhone, but due to a lack of internet connection I could not post them. I was too much of an Uncle Scrooge to pay the 0,49 € per MB roaming costs. And – oh wonder – some days without internet did not kill me, who would have thought that.
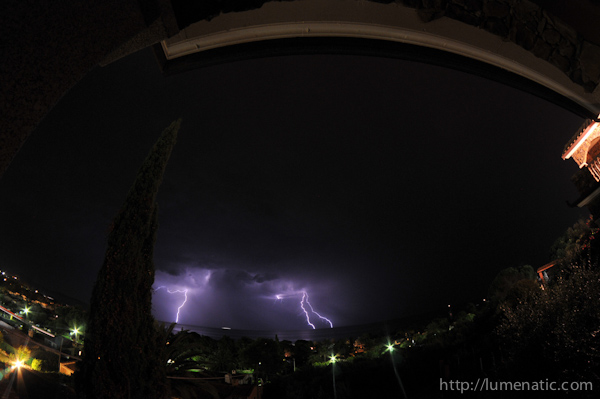
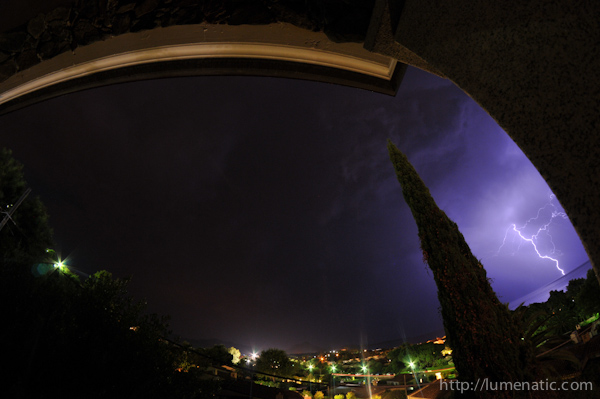
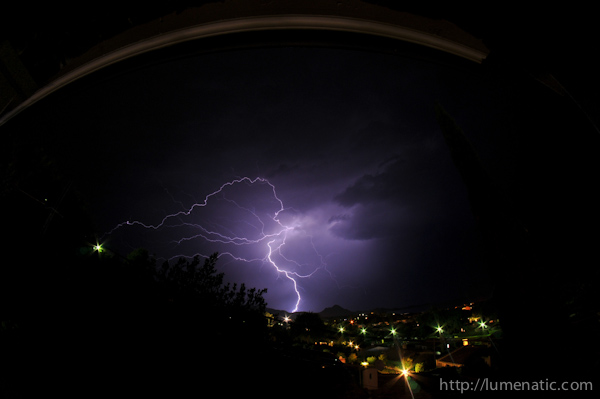
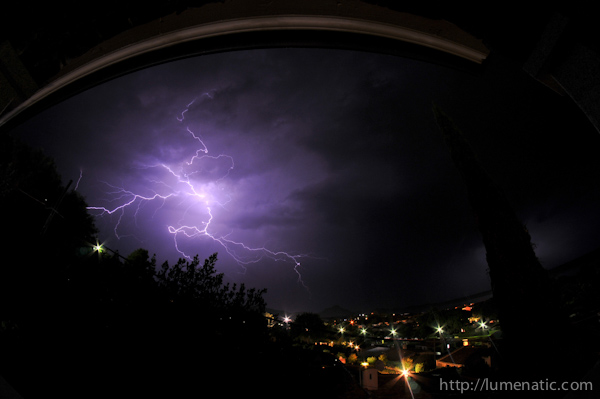
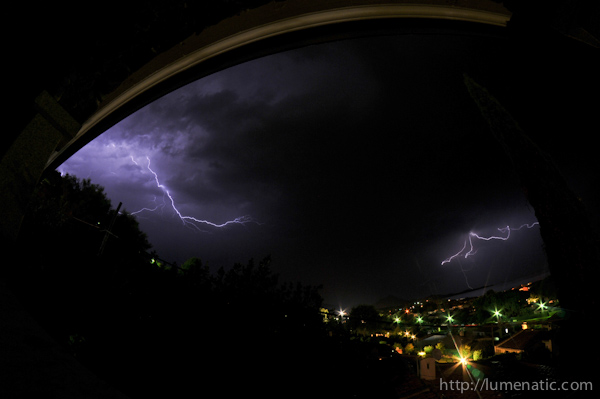
There was a wonderful thunderstorm one night. We had a roofed huge balcony at the apartment and so I could spend some time sitting comfortably in the dry, capturing the raw electrical forces of nature.


Here is, in condensed form, what I experienced.
1.) Focal length and framing.
The longer the focal length, the narrower the opening angle of your frame will be. Lightning strikes at random places (see 4), and the camera has to point the direction the lightning will be. Therefore, by using the shortest focal length you have you cover a huge area of sky, thus broadening the chances that a beautiful lightning will strike within your frame.
OF COURSE this comes with a drawback. I went with the 8 mm Samyang lens, with an astonishing opening angle of about 170deg. Which means, on the one hand I ran a very high probability that a lightning will strike where I point the camera, on the other hand the lightning will be quite small on the frame.
Do what suits you best. If you are very patient you can use, say, 70 mm and wait that lightning will strike where you point your cam.
2.) Exposure. Shutter time is dead, long live ISO and aperture ! Make long-time exposures – 20 sec up, perhaps even bulb mode (=the shutter stays open as long as you press the button). Set the ISO to the lowest possible value and crank up the f-stop. Don’t be afraid if it is 22 for example.
Why do I pronounce the shutter time dead ? How intense the flash will be portrayed is only determined by ISO and aperture. The time you leave the shutter open only increases the chance you will catch a lightning. The lightning lasts only a few hundreds of a second and is very intense. Even if the shutter is open for 30 sec, ISO down and aperture small (=high f-number), the intense flash will leave a beautiful imprint on the sensor.
But remember: The intensity of residuent light on the photo like last streaks of daylight, lanterns and any other light source will of course be affected by the shutter time. These light sources emit light energy constantly, thus the longer you expose, the stronger they become on the pic.
3.) Steady, steady ! It is kind of self-explanatory, but use a tripod and a remote shutter if available. If it s not available, position the camera somewhere steady and do not touch it during the exposure.
I did not have a tripod, so I used the veranda railing. To lift the camera a little I used the case for my Polarizer. A bean bag would also come in handy.
A remote shutter is nice to have, but one can live without it. Firstly, since it is a long time exposure the vibration from pressing the shutter button does not affect the image, the disturbance is too short. Secondly, if you still want to avoid disturbances you have the option to use the timer function of the camera and set it to 2 seconds.
Only if you shoot in bulb mode a remote shutter button is really making sense.
4.) Endure Murphy’s ROFL. Believe me, over the thunder you will definitely hear his laughter. The most spectacular lightnings use to come between two shots. You can minimize the danger by continuously taking exposures, but once your curiosity takes over and you check the pictures- bam. Horizon-to-horizon mother of all lightnings.
So point the camera towards the thunderstorm, choose your focal length, set ISO aperture and shutter time and start shooting !
